平时的开发中会经常遇到一些对象需要转换,本项目记录一些常见对象转换的方法,例如:文件转换、日期时间转换、stream流转换、集合对象转换等, 具体的示例代码见 github 项目:zzycreate/java-convert-example
本文记录一些常用的文件操作,以备需要时直接使用
文件
Java 为文件操作设计了很多的类,有数据相关的 IO Stream 流,与文件相关的File、Path等对文件系统的抽象。
Java 的 io 包和几乎包含了所有操作输入、输出需要的类,另外 java1.4 开始推出的 nio 接口能更高效的完成一些工作。
Java io 包中的流支持很多种格式,比如:基本类型、对象、本地化字符集等等。所有这些流类代表了输入源和输出目标。
一个流可以理解为一个数据的序列。输入流表示从一个源读取数据,输出流表示向一个目标写数据。
IO
IO 流分类:
- 按照流的流向分,可以分为输入流和输出流;
- 按照操作单元划分,可以划分为字节流和字符流;
- 按照流的角色划分为节点流和处理流。
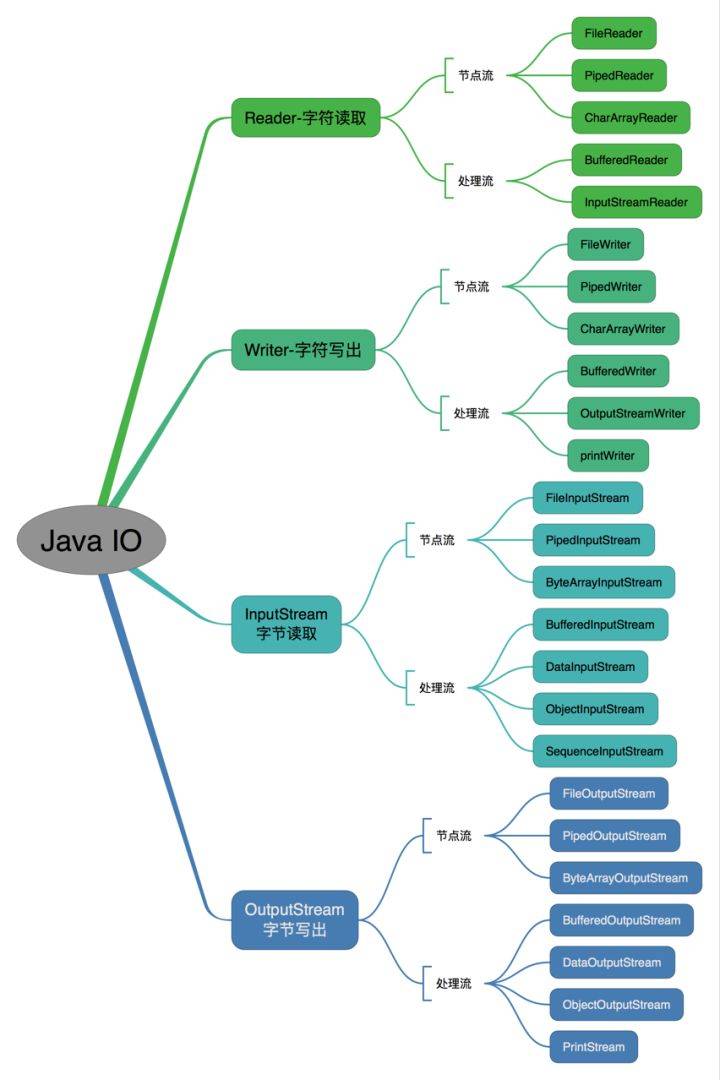
按照操作方式分类:
https://i.loli.net/2020/01/31/B51QcvfjrkKzygM.jpg
java IO Stream 操作方式分类
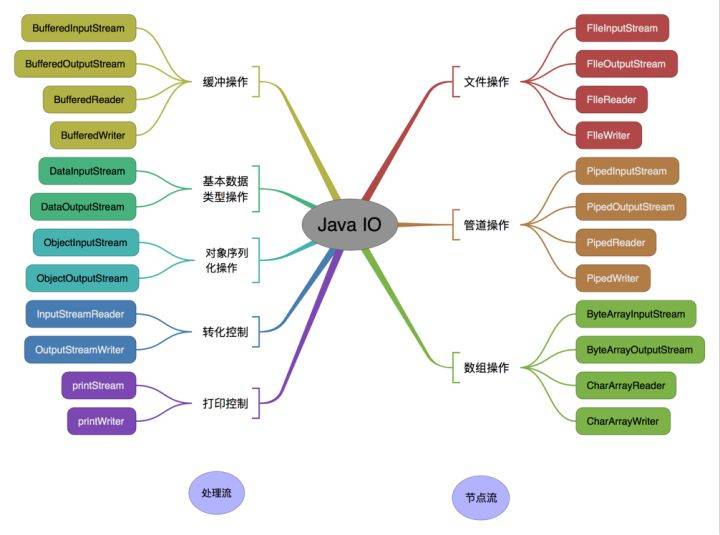
按照操作对象分类:
https://i.loli.net/2020/01/31/T5cL6VxDgeqHvb2.jpg
java IO Stream 操作对象分类
IO 流基础对象:
- InputStream/Reader: 所有的输入流的基类,前者是字节输入流,后者是字符输入流。
- OutputStream/Writer: 所有输出流的基类,前者是字节输出流,后者是字符输出流。
NIO
java 1.4 版本后,重新设计出了一套新的 IO 接口:Non-blocking IO(NIO)
NIO 与 IO 的区别:
- IO是面向流的,NIO是面向缓冲区的;
- IO流是阻塞的,NIO流是不阻塞的;
- NIO有选择器,而IO没有。
读写数据方式:
- 从通道进行数据读取 :创建一个缓冲区,然后请求通道读取数据。
- 从通道进行数据写入 :创建一个缓冲区,填充数据,并要求通道写入数据。
文件
java 文件操作的基础是 File/Path, 一个代表文件,一个代表路径,两者组合完整地描述各种操作系统中的文件,尤其适合 Linux 的
‘Everything is a File’ 的哲学。
String -> File (Write File)
使用 NIO 的 Files (推荐)
由于 Files 是 nio 在 java7 新增的内容,使用本方法需要首先将程序的 jdk 升级到 jdk7+; Files 工具类提供了各种读写创建删除文件等操作,可以很方便的操作文件和流。
- 如果写入的是字符数据,则需要设置字符编码 Charset
- 如果写入的是字节数据(byte[]),不需要设置字符编码
- 如果想在已存在的文件后追加内容,可以增加 java.nio.file.StandardOpenOption#APPEND 参数
DEMO 参考: String2FileWithJavaNioExample
List
Path path = Paths.get(“filename.txt”);
try {
Files.write(path, lines, StandardCharsets.UTF_8);
} catch (IOException e) {
e.printStackTrace();
}
使用 NIO 的 Channel
标准的IO编程接口是面向字节流和字符流的。而NIO是面向通道和缓冲区的,数据总是从通道中读到buffer缓冲区内,或者从buffer写入到通道中。
Java NIO 的 Channel 和 IO 流的对比:
- 通道可以读也可以写,流一般来说是单向的(只能读或者写)。
- 通道可以异步读写。
- 通道总是基于缓冲区Buffer来读写。
DEMO 参考: String2FileWithJavaNioExample
使用 FileOutputStream 的 FileChannel:
String data = “The second line” + System.getProperty(“line.separator”) +
“The second line” + System.getProperty(“line.separator”);
// use ByteBuffer wrap data
final ByteBuffer buffer = ByteBuffer.wrap(data.getBytes());
// try-with-resources auto close the channel
try (// open channel
final FileOutputStream fos = new FileOutputStream(new File(“filename.txt”));
FileChannel channel = fos.getChannel()) {
// write buffer to channel
while (buffer.hasRemaining()) {
channel.write(buffer);
}
} catch (IOException e) {
e.printStackTrace();
}
使用 RandomAccessFile 的 FileChannel:
String data = “The second line” + System.getProperty(“line.separator”) +
“The second line” + System.getProperty(“line.separator”);
final ByteBuffer buffer = ByteBuffer.wrap(data.getBytes());
try(final RandomAccessFile file = new RandomAccessFile(“filename.txt”, “rw”);
FileChannel channel = file.getChannel()){
while (buffer.hasRemaining()){
    channel.write(buffer);
}
} catch (IOException e) {
e.printStackTrace();
}
使用 BufferedWriter (推荐)
- BufferedWriter 可以设置缓存区大小
- OutputStreamWriter 可以指定字符集编码
- FileOutputStream 可以指定文件编辑模式(追加/覆盖)
使用 PrintWriter/FileWriter 一般写入的内容比较少,如果需要写入大量数据,应该要使用缓冲流,提高效率。
DEMO 参考: String2FileWithWriterExample
try (Writer writer = new BufferedWriter(new OutputStreamWriter(
new FileOutputStream(“filename.txt”, true), StandardCharsets.UTF_8))) {
writer.write(“The second line” + System.getProperty(“line.separator”) +
“The second line” + System.getProperty(“line.separator”));
} catch (IOException e) {
e.printStackTrace();
}
使用 PrintWrite
使用PrintWrite可以很简单的使用println进行单行输入,但是存在的文件会被截断
- 如果文件已经存在,PrintWriter 会将文件大小截断为零,如果不想截断文件,可以使用FileWriter作为替代,FileWriter设置字符大小和缓冲大小。
- 使用 PrintWriter 不需要输入文件 path,所以创建文件的路径需要看执行程序时的工作目录。
- PriteWriter 会导致吞异常,见 stackoverflow.com/a/1747092/4678667 。
DEMO 参考: String2FileWithWriterExample
try (PrintWriter writer = new PrintWriter(“filename.txt”, “UTF-8”)) {
writer.println(“The first line”);
writer.println(“The second line”);
} catch (FileNotFoundException | UnsupportedEncodingException e) {
e.printStackTrace();
}
使用 FileWriter
FileWriter 在创建的时候可以指定追加/覆盖模式,避免 PrintWriter 截断已存在的文件。
DEMO 参考: String2FileWithWriterExample
try (FileWriter writer = new FileWriter(new File(“filename.txt”), true)) {
writer.append(“The first line”).append(System.getProperty(“line.separator”))
.append(LINE2).append(System.getProperty(“line.separator”));
} catch (IOException e) {
e.printStackTrace();
}
使用 commons-io 的 FileUtils
Commons-io 项目地址: apache/commons-io
使用 commons-io 包中的 FileUtils 进行文件写入, 重构的方法可以设置文件编码和写入模式
DEMO 参考: String2FileWithCommonsExample
try {
String data = “The second line” + System.getProperty(“line.separator”) +
“The second line” + System.getProperty(“line.separator”);
FileUtils.writeStringToFile(new File(“filename.txt”), data, StandardCharsets.UTF_8, true);
} catch (IOException e) {
e.printStackTrace();
}
使用 guava 的 Files
Guava 的官方开源项目地址: google/guava
guava 的 Files 可以直接向文件中写入 byte[] 数据
Files 已被标注为 @Beta 不稳定的版本,并提示使用 jdk7 nio 的 Files、MoreFiles 等工具类利用 nio 的 Path 进行文件处理
DEMO 参考: String2FileWithGuavaExample
try {
String data = “The second line” + System.getProperty(“line.separator”) +
“The second line” + System.getProperty(“line.separator”);
Files.write(data.getBytes(), new File(“filename.txt”));
} catch (IOException e) {
e.printStackTrace();
}
使用 guava 的 CharSink/ByteSink
guava 的 CharSink 可以直接向文件中写入字符数据,ByteSink 则可以写入字节数据
Files 中的 write、append、copy 等方法本质上都是调用的这些 Sink 类。
DEMO 参考: String2FileWithGuavaExample
try {
String data = “The second line” + System.getProperty(“line.separator”) +
“The second line” + System.getProperty(“line.separator”);
Files.asCharSink(new File(“filename.txt”), StandardCharsets.UTF_8, FileWriteMode.APPEND).write(data);
} catch (IOException e) {
e.printStackTrace();
}
File -> String (Read File)
使用 NIO 的 Files (推荐)
NIO 的 Files 工具类提供多种 read 方法可以快速进行文件读取
DEMO 参考: File2StringWithNioExample
使用 readAllBytes 读取字节:
try {
return new String(Files.readAllBytes(Paths.get(“filename.txt”)));
} catch (IOException e) {
e.printStackTrace();
}
使用 readAllLines 逐行读取字符串:
try {
List
StringBuilder sb = new StringBuilder();
lines.forEach(s -> sb.append(s).append(SEPARATOR));
return sb.toString();
} catch (IOException e) {
e.printStackTrace();
}
return null;
由于 Stream 内部无法在 lambda 中使用带有 checked Exception 的方法,因此要对异常的抓取,防止发生异常
使用 lines 逐行读取字符串:
try (Stream
StringBuilder content = new StringBuilder();
lines.forEach(s -> content.append(s).append(SEPARATOR));
return content.toString();
} catch (IOException e) {
e.printStackTrace();
}
使用 Scanner
Scanner 默认的缓冲大小为 1024, 可以读取文件,但是读取空文件的时候会出现异常,见 Scanner的讨论
DEMO 参考: File2StringWithScannerExample
try (Scanner scanner = new Scanner(new File(FILE_NAME_INPUT), “UTF-8”)) {
return scanner.useDelimiter(“\A”).next();
} catch (FileNotFoundException e) {
e.printStackTrace();
}
使用 BufferedReader (推荐)
BufferedReader 缓冲流,可以高效的读取文件,使用 Reader 和 InputStream 组合可以设置各种配置。
- 使用 InputStreamReader 可以设置字符集
- 使用 FileInputStream 可以读取文件
- 或者使用 FileReader 直接读取文件,并用 BufferedReader 包装成缓存使用
DEMO 参考: File2StringWithReaderExample
// new BufferedReader(new FileReader(“filename.txt”));
try (BufferedReader reader = new BufferedReader(new InputStreamReader(new FileInputStream(“filename.txt”), StandardCharsets.UTF_8))) {
String line;
StringBuilder stringBuilder = new StringBuilder();
while ((line = reader.readLine()) != null) {
stringBuilder.append(line).append(SEPARATOR);
}
return stringBuilder.toString();
} catch (IOException e) {
e.printStackTrace();
}
使用 FileInputStream
仅仅使用 FileInputStream 进行文件读取,从 FileInputStream 写入 byte[] 缓存,转换为文本数据,这段代码只需要 jdk1.0+
DEMO 参考: File2StringWithReaderExample
FileInputStream fis = null;
try {
fis = new FileInputStream(“filename.txt”);
byte[] buffer = new byte[fis.available()];
int length = fis.read(buffer);
return new String(buffer, 0, length, StandardCharsets.UTF_8);
} catch (IOException e) {
e.printStackTrace();
} finally {
if (fis != null) {
try {
fis.close();
} catch (IOException e) {
e.printStackTrace();
}
}
}
return null;
使用 commons-io 的 IOUtils
commons-io 的 IOUtils 工具类提供了大量 IO 相关的工具方法,使用 IOUtils.copy 直接将 Reader/InputStream 转换为 Writer/OutputStream
DEMO 参考: File2StringWithCommonsExample
使用 FileReader 读取文件,使用 StringWriter 将流中的内容输出出来:
try (FileReader fileReader = new FileReader(“filename.txt”);
StringWriter stringWriter = new StringWriter()) {
IOUtils.copy(fileReader, stringWriter);
return stringWriter.toString();
} catch (IOException e) {
e.printStackTrace();
}
使用 commons-io 的 FileUtils
commons-io 的 FileUtils 提供了文件相关的工具方法, 使用 FileUtils.readByFileUtilsReadFileToString 读取文件内容
DEMO 参考: File2StringWithCommonsExample
try {
return FileUtils.readFileToString(new File(“filename.txt”), StandardCharsets.UTF_8);
} catch (IOException e) {
e.printStackTrace();
}
使用 guava 的 Files
直接使用 guava 的 Files 转换为 ByteSource/CharSource 然后直接 read 成字符串:
try {
// Resources.asCharSource(new URL(“”), StandardCharsets.UTF_8).read();
return Files.asCharSource(new File(“filename.txt”), StandardCharsets.UTF_8).read();
} catch (IOException e) {
e.printStackTrace();
}
或者使用 readLines 逐行读取:
try {
return String.join(System.getProperty(“line.separator”), Files.readLines(new File(“filename.txt”), StandardCharsets.UTF_8));
} catch (IOException e) {
e.printStackTrace();
}
File -> File (copy File)
使用 NIO 的 Channel
标准的IO编程接口是面向字节流和字符流的。而NIO是面向通道和缓冲区的,数据总是从通道中读到buffer缓冲区内,或者从buffer写入到通道中。
Java NIO 的 Channel 和 IO 流的对比:
- 通道可以读也可以写,流一般来说是单向的(只能读或者写)。
- 通道可以异步读写。
- 通道总是基于缓冲区Buffer来读写。
Buffer 及其子类不是线程安全的
Buffer 的属性:
- capacity - 缓存容量
- limit - 缓存下表限制值
- position - 当前操作的下标值
- mark - 临时下标值
几个属性的关系: 0 <= mark <= position <= limit <= capacity
Buffer 的方法:
- mark(): mark 设置成 position
- clear(): mark 设置为 -1 清除标记, position 设置为 0, limit 设置为 capacity, 数据写入 Buffer 前调用
- flip(): limit 设置成 position 当前位置作为上限, position 设置为 0, Buffer 读取数据前调用
- rewind(): position 设置为 0, limit 不变, 数据重新写入 Buffer 前调用
使用不同的 Channel 同时操作同一个 Buffer 可以实现文件的复制。
DEMO 参考: File2FileWithNioExample
try (FileInputStream input = new FileInputStream(“filename.txt”);
FileOutputStream output = new FileOutputStream(“filename.txt”);
ReadableByteChannel from = input.getChannel();
WritableByteChannel to = output.getChannel()) {
ByteBuffer buffer = ByteBuffer.allocateDirect(16 * 1024);
while (from.read(buffer) != -1) {
// Prepare the buffer to be drained
buffer.flip();
    // Make sure that the buffer was fully drained
    while (buffer.hasRemaining()) {
        to.write(buffer);
    }

    // Make the buffer empty, ready for filling
    buffer.clear();
}
} catch (IOException e) {
e.printStackTrace();
}
原文链接:https://zzycreate.github.io/2019/05/04/java-convert-example-file/

